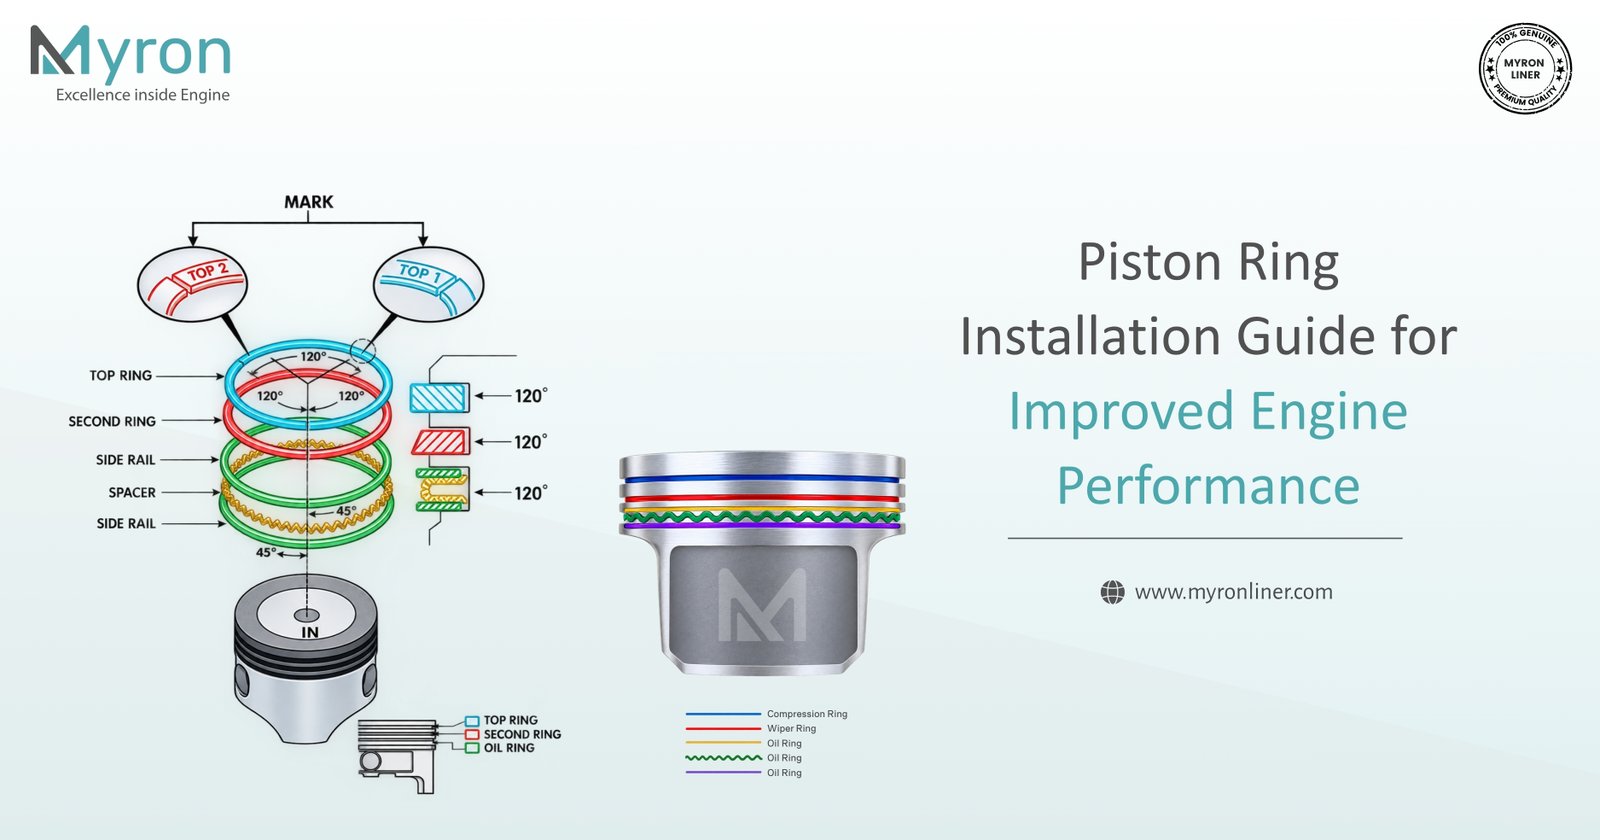
Piston Ring Installation Guide for Improved Engine Performance
When you aim to boost Engine Performance and maximise Engine Efficiency, proper piston ring installation is a key factor. Whether you're a seasoned technician or a precision‑minded enthusiast, following a structured, aftermarket-focused installation process will ensure compression integrity, oil control, and long‑term reliability.
Why Piston Rings Matter: Understanding Their Role
A piston ring is a split metallic ring, typically cast iron or steel, fitted into grooves around the piston. Its primary role is threefold: sealing combustion gases, aiding heat transfer to the cylinder wall, and regulating oil consumption.
Most engines use three rings per cylinder—two compression rings, which form the combustion seal, and a lower oil control ring (also called a scraper ring) to return excess oil to the sump and prevent oil burn.
Without correct installation, things like blow-by (leakage of combustion gases into the crankcase), poor lubrication, overheating, and lower power output can occur. A sealed, well-lubricated cylinder is essential for peak engine efficiency and performance.
Step-by-Step Piston Ring Installation
Step 1: Gather Tools and Prepare a Clean Workspace
Before touching the piston or rings, ensure your workspace is free from dust, metal filings, or any debris that can damage components.
Essential tools include:
- Piston ring expander or installer
- Piston ring compressor
- Feeler gauge for checking end gap
- Torque wrench (for later assembly)
- Assembly lube or clean engine oil
Why it matters for Engine Efficiency: Even the smallest dirt particles can scratch the piston or cylinder wall, causing blow‑by and reduced sealing. Cleanliness sets the foundation for successful installation.
Step 2: Inspect the Piston and Ring Grooves
Check the piston for cracks, scoring, or excessive wear. Use a groove cleaner or an old piston ring to scrape out carbon deposits from the grooves. Make sure each groove is smooth and free of burrs.
Why this is critical: Carbon deposits can stop the ring from moving freely, leading to poor sealing, increased friction, and reduced Engine Performance.
Step 3: Check Ring End Gap in the Cylinder
Before installing the rings on the piston, measure each ring's end gap inside the cylinder or liner it will operate in.
Process:
- Place the ring into the cylinder bore.
- Use the piston to push it about 20 mm down to ensure it is square to the bore.
- Use a feeler gauge to measure the gap between the ring ends.
Manufacturer guidelines:
- If the gap is too small, file it slightly using a ring filer.
- If it's too large, sealing will be weak, leading to power loss.
Correct gap ensures proper expansion during operation, preventing seizure and improving Engine Efficiency.
Step 4: Identify Ring Positions and Types
Typically, there are three rings per piston:
- Top Compression Ring – Seals combustion gases.
- Second Compression Ring – A backup seal and scraper to control oil film.
- Oil Control Ring (Scraper Ring) – Returns excess oil to the crankcase.
For engines using compressor piston rings (in industrial compressors or heavy-duty applications), ensure the set matches the correct dimensions and materials for your cylinder liner.
Follow the markings (usually "TOP") and face each ring correctly as per manufacturer guidelines.
Read more: Complete Guide to Piston Rings: Types, Functions, and Materials.
Step 5: Install the Oil Control Ring
Start from the bottom groove and move upward.
Steps:
- If using a three-piece oil ring, first place the expander spring into the groove without overlapping the ends.
- Install the lower rail by gently spreading it with your fingers or a ring expander tool. Do not twist the ring.
3. Install the upper rail in the same manner.
4. Check that both rails move freely and that the expander spring is properly seated.
Common mistakes to avoid:
- Overlapping expander ends causes tight spots and excessive wear.
- Forcing the ring can distort it, reducing oil scraping ability and Engine Performance.
Step 6: Install the Second Compression Ring
The second compression ring is sometimes tapered or has a step-cut face.
Steps:
1. Verify orientation: Many rings have "TOP" stamped on them. This side must face upward.
Use a piston ring expander to open the ring just enough to slip over the piston and into the second groove.
3. Ensure the ring rotates freely without binding.
This ring helps prevent oil from reaching the combustion chamber and backs up the top ring's sealing action.
Step 7: Install the Top Compression Ring
The top compression ring is most critical for combustion sealing and power output.
Steps:
Check orientation markings. Some rings are barrel-faced, keystone-shaped, or have coatings that must face upward.
2. Using the expander tool, spread the ring carefully and slide it into the top groove.
3. Once seated, rotate the ring slightly to ensure it's not pinched.
Impact on Engine Efficiency: Correctly installed compression rings minimise blow‑by, leading to better power, fuel efficiency, and longer life.
Step 8: Position Ring Gaps Correctly
Ring gap placement prevents alignment of leak paths.
Procedure:
Place the top compression ring gap at the 10 o'clock position.
2. Place the second compression ring gap at the 4 o'clock position.
3. Place the oil control ring gaps at opposite sides of the expander joint.
Manufacturer guidelines: Gaps should be spaced evenly around the piston, usually 120° apart.
Why it matters: Misaligned gaps can cause excessive blow‑by, loss of compression, and reduced Engine Performance.
Don't miss to check: Best Piston Ring Manufacturers in India.
Step 9: Lubricate Piston and Rings
Apply a thin coat of engine oil or assembly lube to each ring and piston skirt. Light lubrication ensures smooth installation into the bore and prevents dry starts.
Over-lubrication can lead to carbon deposits, while no lubrication can cause ring or liner scoring.
Step 10: Compress Rings and Insert Piston
Once all rings are installed:
- Place a quality piston ring compressor around the piston. Ensure it is tightened evenly.
- Lubricate the cylinder liner wall.
- Position the piston with the connecting rod aligned to the crank journal.
- Tap the piston lightly with a wooden or plastic hammer handle until it slides into the bore.
Tips:
- Keep the piston straight to avoid ring damage.
- If resistance feels too high, stop and check if the ring is caught.
Step 11: Check Piston Movement and Ring Seating
After installation, rotate the crankshaft to ensure the piston moves freely. There should be no tight spots or grinding.
Why this check is important:
- Confirms rings are seated correctly.
- Prevents potential scoring during the first engine start.
Step 12: Final Inspection and Assembly
Once pistons are installed, wipe away excess oil from the block deck, check torque settings, and proceed with cylinder head installation as per manufacturer guidelines.
Correct piston ring installation delivers proper compression, lower oil consumption, and optimum Engine Efficiency.
Read more: Understanding How Engine Piston Rings Work.
Initial Break‑In and Bedding
Once the engine is assembled, run it using the supplier's recommended procedure—typically gradual RPM increases and limited load to bed the rings properly. During the first few hours, Engine Efficiency improves as the rings seat, forming a tight, gas‑sealed contact with the cylinder liner.
Follow your manufacturer's guidelines for the exact duration and RPM regime. Monitor oil consumption, smoke, and compression readings to verify proper sealing.
Why Precision Matters: Tolerances & Fit
Piston rings contribute significantly to mechanical friction—around 24 % of total friction in many engines. But too loose and sealing suffers; too tight and friction rises, harming efficiency. Striking the balance improves output, reduces wear, and delivers long-lasting performance.
Adhering to precision assembly, accurate ring gapping, and proper orientation ensures that your piston ring installation leads to the intended improvements in compression, reduced oil use, and better thermal management.
Final Thoughts: Getting Engine Parts Right Matters
For high-quality engine parts suppliers like Myron Liner, precision in manufacturing cylinder liners (and matching aftermarket piston rings) is essential. Even the most robust compressor piston rings or innovative compression rings depend on dimensions and surface finishes produced to tight tolerances.
Why Choose Myron Liner for Your Engine Parts
Myron Liner is a leading manufacturer and supplier of premium cylinder liners and sleeves tailored for aftermarket engine applications. They specialize exclusively in aftermarket, high-performance engine parts, delivering precision-engineered liners that pair perfectly with aftermarket piston ring installation kits. Their cylinder liners are built to support enhanced engine performance, ensure excellent oil control, and optimise engine efficiency—whether you're rebuilding industrial engines, marine units, compressors, or high‑output applications.
Reference:
Piston ring by Wikipedia[1].
FAQ
1. What happens if piston ring gaps are not set correctly?
Misaligned gaps cause blow‑by, poor sealing, and power loss, reducing Engine Performance significantly.
2. Can piston rings be reused?
Reusing old rings is not recommended. New rings ensure proper sealing and improve Engine Efficiency.
3. How do I know if my piston rings are seated properly?
Check compression readings after break-in. Stable readings indicate correct seating and installation.
4. How should piston rings be aligned?
Stagger the ring gaps around the piston, typically 120° apart, to prevent compression leaks and improve sealing.
5. Do piston rings need oil to seal?
Yes, a thin oil film helps the rings seal against the cylinder wall and prevents wear during operation.
Reference & Trademark Disclaimer
All manufacturer names, trademarks, logos, product names, part numbers, model numbers, descriptions, and other identifying references mentioned in this article are used for identification, reference, and cross-reference purposes only.
Such references do not imply any affiliation, association, authorization, sponsorship, approval, or endorsement by the respective manufacturers or trademark owners. All trademarks, brand names, product names, part numbers, and related intellectual property remain the property of their respective owners.
MYRON LINER LLP is an independent manufacturer and supplier of engine components. The use of any third-party name or reference is solely intended to help readers identify the applicable engine, component, or application.